
We hosted a snow globe making class for teens on December 27. Below are the instructions so you can make your own snow globe at home! Prefer a printable pdf version? Here you go.
These instructions require an oven and sharp knife, adult supervision is required.
Here are the supplies you’ll need:
- A canning jar with a rubber seal lid (aka a mason jar)
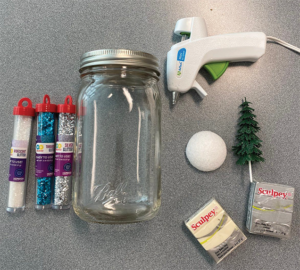
- Polymer clay (we used Sculpey III which is easily found at stores like Walmart and Hobby Lobby)
- Glitter
- A foam craft ball (of a similar diameter to your canning jar)
- Plastic accessories
- Hot glue
- Water (filtered or distilled)
The most important thing to note when considering what to put into your snowglobe is that things that have been painted may discolor your water. For example, you won’t want to use a bristle brush tree because the color may come off of the tree and turn your water green. That’s why we used polymer clay – this clay is plastic-based and comes in many different colors, so you won’t need to use paint with it, thus preventing murky water. Keep this in mind when choosing other accessories to put in your snow globe. At the Library, we used evergreen cupcake toppers. These small plastic trees were sure to be waterproof.
Now that you know what you need, follow these steps:
- Create your custom figure. Use the polymer clay to create a custom figure for your snowglobe. Ensure that your figure stays small enough to fit inside your jar. If you’re not sure what to make, try a snowman or a winter animal like an arctic fox or hare. You can create your figure by making separate parts and then attaching them. Polymer clay attaches to itself fairly easily, but make sure to smooth over any seams to prevent the figure from breaking apart. Need more info and tips on polymer clay? Check out this video: https://www.youtube.com/watch?v=wZStexRD7HI
- Bake your figure. Once you’re happy with what you created, you need to bake it in the oven so the clay can cure. Each type of clay has its own time and temp instructions. Follow this link for common brands and their baking instructions: https://polymerclaysuperstore.com/pages/how-to-bake-sculpey-clay. Clay can be baked in a kitchen oven or a toaster oven. If you use a toaster oven, beware of burning! Watch this video for helpful tips on ensuring your clay doesn’t burn: https://www.youtube.com/watch?v=NUSy6gR6CzU
- Set the scene. Once you have your figure, set up your winter scene. I suggest creating your winter scene on top of half a foam crafting ball. This gives your scene more height, allowing it to be above the neck of your mason jar for maximum visibility. Foam balls can easily be cut in half with a steak knife or box knife. Your polymer figure and any plastic accessories you would like to include in your scene can be attached to your foam ball using hot glue. Then, you can glue the foam ball to the lid of your jar. Use a generous amount of hot glue to firmly secure everything in place.
- Put it all together. Put glitter in your jar and then fill it with water. At the Library, we used filtered water, but many websites suggest distilled water instead. You’ll want to fill your jar all the way to the lip of the opening for minimum air bubbles. Then set the lid on the jar and tightly twist it closed. That’s it! Now, your snow globe is ready to be shaken and displayed!
Note: It is not suggested that you glue your jar lid shut. You will want to leave your winter scene accessible just in case anything breaks, comes unglued, etc.